-
Products
-
Transportation & Mobility Solutions
Transportation & Mobility Solutions
At Hitachi, we engineer industry-leading transportation and mobility solutions by leveraging decades of knowledge and using high-quality automotive material and components.
-
Energy Solutions
Energy Solutions
We believe the only solution for fulfilling the growing power requirements of industries and society is through a comprehensive portfolio of sustainable energy solutions and delivering innovative high-efficiency energy systems.
-
IT Infrastructure Services
IT Infrastructure Services
Hitachi’s state-of-the-art IT products and services are known to streamline business processes which result in better productivity and a higher return on investment (ROI).
- Application Modernization
- Consulting Services
- Data Modernization
- Data Storage
- Data-Driven Industrial Operations
- DataOps
- Digital Transformation
- Edge to Cloud Infrastructure Services
- Industrial Data & IoT Management
- Industry Solutions
- Infrastructure Management & Analytics
- Infrastructure Modernization
- Managed Security
- X-as-Service - Everflex
-
Social Infrastructure: Industrial Products
Social Infrastructure: Industrial Products
Within the industrial sector, Hitachi is consistently delivering superior components and services, including industrial and automation solutions, useful in manufacturing facilities.
-
Healthcare & Lifesciences
Healthcare & Lifesciences
At Hitachi, we believe that healthcare innovation is crucial to a society’s advancement. A strong healthcare sector is often considered an inseparable element of a developed society.
-
Scientific Research & Laboratory Equipments
Scientific Research & Laboratory Equipments
Hitachi focuses on extensive research and development, transformative technology, and systems innovation to unfold new possibilities and create new value through scientific endeavors that strengthen the connection between science and social progress.
-
Smart Audio Visual Products
Smart Audio Visual Products
Since 1956, Hitachi audio visual products have provided state of the art solutions to consumers all over the world. It has been our pleasure to design competitive products at the lowest possible prices while maintaining our industry-leading quality standards for your comfort and enjoyment.
-
View All Products
Hitachi Products & Solutions
Hitachi, a technology leader in the U.S., offers a diverse set of products and solutions, and breakthrough technologies for smart manufacturing, green energy and mobility solutions that empower governments, businesses, and communities.
-
Transportation & Mobility Solutions
- Social Innovation Solutions
-
About Us
-
Hitachi in the U.S.A.
Hitachi in the U.S.A.
Discover information about the Hitachi group network across the Americas, upcoming events and sustainability endeavours, CSR policies, and corporate government relations.
-
About Hitachi Group
About Hitachi Group
Explore our leadership team, investor relations, environmental vision, and sustainability goals. Learn how Hitachi is leveraging its research & development capabilities for social innovation across industry verticals.
-
Hitachi in the U.S.A.
- News Releases
- Case Studies
- Careers
- R&D
Hitachi and Daicel Develop Image Analysis System to Detect Signs of Facilities Failures and Deviations in Front-line Worker Activities
Contributes to increased quality and productivity through linked operations of manufacturing execution systems

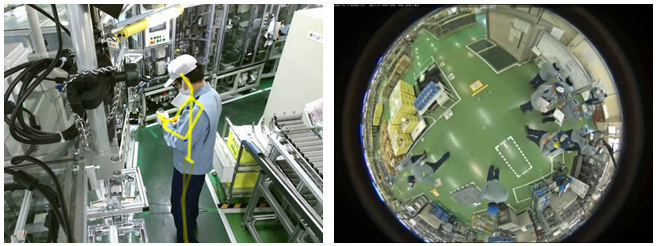
Examples of front-line worker / facilities sensing using image analysis system
Tokyo, July 13, 2016 -- Hitachi, Ltd. (TSE:6501, “Hitachi”) announced today that in collaboration with Daicel Corporation(TSE:4202, “Daicel”), it has developed an image analysis system that supports quality improvements and increased productivity by detecting signs of operational failures in production line facilities and deviations in worker activities on the front lines of manufacturing.
For 16 months starting in February 2015, Hitachi and Daicel have been conducting joint verification tests aimed at the practical application of this image analysis system at Daicel’s Harima Plant (Tatsuno City, Hyogo Prefecture, “Harima Plant”), which manufactures core components for airbags. As a result of these tests, by connecting with the manufacturing execution systems, this image analysis system is expected to be able to dramatically improve the in-process guarantee rate*1 for products through a transition from “representative point management” in quality assurance based on lots to “all point management” (continuous monitoring of the status of Man, Machine, and Material) based on individual product serial numbers. Furthermore, by shifting the role of on-site management supervisors from a focus on “after the fact” measures to the monitoring of trends and preventative measures using obtained image data, they will tie these activities into the prevention of failures before they occur.
Hitachi and Daicel will begin operations of this image analysis system at the Harima Plant in FY2016, and plan to promote rollout to six of Daicel’s main overseas plants.
In recent years, mega-recalls in various industries have brought about a renewed awareness of the importance of accumulating and managing manufacturing performance data to identify the causes of product defects, and to implement countermeasures. In the advanced manufacturing workplaces of the future, it will be necessary to gather a wide range of work related performance data, including manufacturing performance and inspection data and the results of visual checks by workers, achieve new traceability by establishing mutual links among these different forms of product performance data. All of this will be achieved by introducing new manufacturing execution systems that incorporate IoT technologies.
Hitachi and Daicel studied manufacturing performance data at the Harima Plant from the perspectives of “3M” – Man, Machine, and Material – and examined ways of tying the results of these studies into the fourth M – Methods – in order to create new production innovation methods using Hitachi’s cutting-edge IoT technologies in automotive airbag inflator production processes, as part of Daicel’s assembly operations.
As a result, by quantitatively determining the status of machines, materials, and worker activities on the front lines of manufacturing, it was determined that this approach is effective in improving product quality and in increasing productivity and the accuracy of traceability.
Recently, based on the expertise in production innovations cultivated at the Harima Plant, Hitachi and Daicel developed an image analysis system that supports improvements in quality and productivity as well as the rapid discovery of defects in machines and materials and deviations in worker activities by analyzing surveillance videos on the front lines of manufacturing using Hitachi’s image analysis technologies, and conducted joint verification tests of this system.
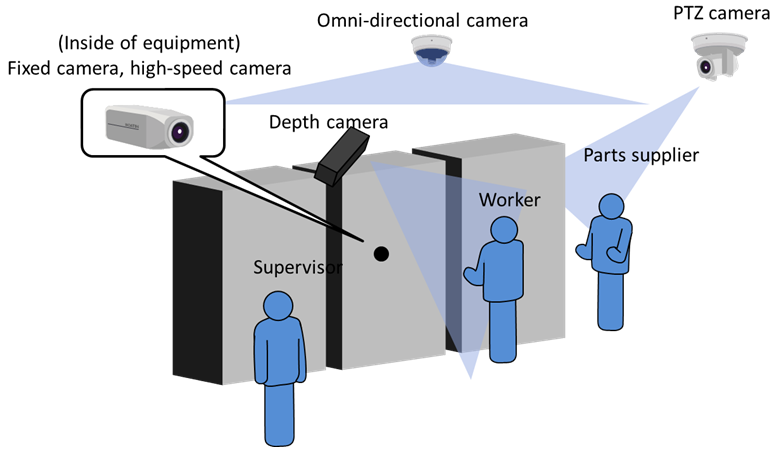
This image analysis system uses depth cameras to extract 3-D forms in order to measure worker activities from the “3M” perspective mentioned above, and obtains positional information on human joints, such as hands, elbows, and shoulders. Then, based on frontline interviews and observations, it derives standard behavior models that exclude information not directly related to tasks (e.g., the length of arms and legs), and identifies deviations in worker activities by using statistical comparisons with those standard behavior models. The system also detects abnormalities in the case of defects in materials and facilities by analyzing differences compared to video images under normal conditions. In addition, the system is able to detect abnormalities in the case of welding defects, by combining voltage and current data from existing facilities with light emitting element color analysis using high speed cameras. In this way, the system quickly extracts only information related to improvements in quality and productivity from huge volumes of video data, and combines this function with data analysis to improve work efficiency and quality stabilization, and to quickly discover defects. In addition, by accumulating image data and connecting final products based on individual product serial numbers, this image analysis system can detect production processes which cause defected products, and improve them. Furthermore, when inappropriate operation is detected, it can trace final products based on serial numbers, thus achieving multi-traceability.
In the future, starting at the Harima Plant, Hitachi and Daicel plan to install this image analysis system at six overseas plants, and aim to construct a globally integrated management system by aggregating and analyzing information via cloud service. Hitachi will make this image analysis system available to the manufacturing industry worldwide as generalized digital solutions by applying ideas and technologies of the IoT platform “Lumada”.
*1 Non-defective product ratio in individual processes on assembly and manufacturing lines. The non-defective product ratio for final products can be increased by identifying and removing defective parts from individual processes and sending only non-defective products to downstream processes.
Analysis targets and sensing methods
|
Category |
Analysis targets |
Sensing methods |
|
Man |
Worker activities |
Depth cameras |
|
Position of supervisors and parts suppliers |
Omni-directional cameras |
|
|
Machine |
Location of work abnormalities, welding defects |
Fixed cameras, high-speed cameras |
|
Material |
Parts supply |
PTZ cameras*2 |
* 2 PTZ (Pan, Tilt, Zoom) camera: A camera that can capture subjects in high resolution with pinpoint accuracy
Various camera installations


